None of the WordPress migration or backup and restore plugins can handle huge sites reliably – you’ll run into timeout issues etc. Here’s how to migrate your huge sites reliably. The guide below presumes you have an origin WordPress server and a destination WordPress-ready (PHP+MySQL+Nginx) server.
Table of Contents
- Use SSH and Screen
- Create a MySQL backup reliably
- Transfer all your files across
- Restoring your database
- Configure Nginx to look at the new files
- Changing Domain Names on huge sites
- Migrating SSL certificates
- Additional SSL migration steps when migrating from proxy-SSL
- Fixing WordPress file and folder permissions
- Debugging & Troubleshooting any issues
- Summary
Use SSH and Screen
You need to be able to SSH onto your server to do this reliably. You also need to be able to rely on the process completing, even if you switch your computer off or your session gets terminated (like if your network connection drops). Screen is what we need for that purpose – it creates a detachable screen inside SSH that will keep running even when we disconnect from the server.
To use screen, just run:
screen
(then hit enter a few times)
You can then run commands then hit CTRL+A CTRL+D and it will disconnect from the ‘screen’.
You can reattach detached screens using:
screen -r
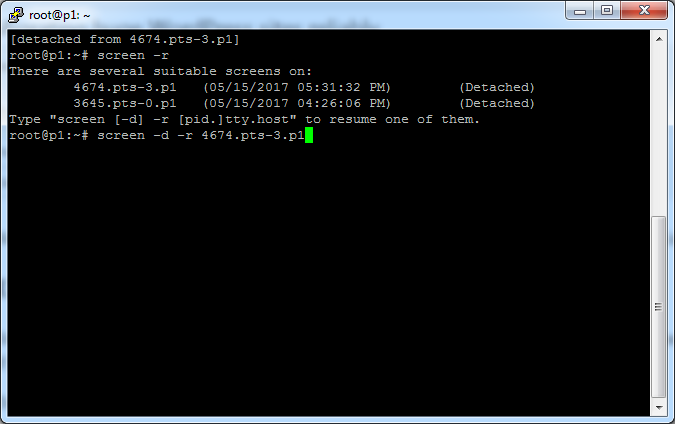
If there’s more than one detached screen, it’ll instead list the detached screens like this:

And you can reconnect by copying one of the session identifiers into a command like this:
screen -d -r 4674.pts-3.p1
Create a MySQL backup reliably
This technique always works, provided you have enough storage space. If you need more storage space, add a Digital Ocean volume temporarily. If your database is huge, run Screen first so the command doesn’t get interrupted if you disconnect.
mysqldump -uWPDBUSER -p WPDBNAME > '/root/dump.sql'
Transfer all your files across
SSH into your destination server, install rsync, then use rsync to run the transfer. The advantages of rsync over FTP are many – it doesn’t break with long path names, it retries if the connection drops, it continues until complete – it works. If you have a lot of files, you should run screen first, so rsync will just keep going even if your SSH session disconnects.
sudo apt-get install rsync
rsync -chavzP --stats  root@sourceip:/var/www/ /var/www/
(replace root@ with username@ if you’re not using the root user)
Also grab the dump.sql file:
rsync -chavzP --stats root@sourceip:/root/dump.sql /root/dump.sql
If you need to exclude a particular folder, you can do so – but bear in mind the folder to exclude is relative to the path you entered, e.g. to exclude the /var/www/yourdomain.com/wp-content/uploads folder use:
rsync -chavzP --stats --exclude 'yourdomain.com/wp-content/uploads' root@sourceip:/var/www/ /var/www/
Note: If the origin server uses SSH keys, then generate a key on your destination server and insert the /root/.ssh/id_rsa.pub key into /root/.ssh/authorized_keys on the source server so you can authenticate.
ssh-keygen
cat /root/.ssh/id_rsa.pub
If you can’t SSH to the old site (shared hosting?) there is probably cPanel available, so get a cPanel backup created from the originating site and FTP that over instead.
Restoring your database
You can use a plugin like UpdraftPlus if your databases are small enough. But if you’re up at a few GB or near TB or past then you should be using mysql from the command line to avoid timeouts and ensure completion.
If you haven’t already, create a database user for the database:
(from inside mysql)
create database dbname;
CREATE USER 'username'@'localhost' IDENTIFIED WITH mysql_native_password BY 'CHOOSEASTRONGPASSWORD';
GRANT ALL PRIVILEGES ON dbname.* TO 'username'@'localhost';
Note: If you are migrating to a cluster, run this shell command before you attempt the restore, or if the restore fails. Clusters cannot use MyISAM.
sed -i 's/MyISAM/InnoDB/g' dump.sql
sed -i 's/^UNLOCK TABLES/-- UNLOCK TABLES/g' mysql.sql
sed -i 's/^LOCK TABLES/-- LOCK TABLES/g' mysql.sql
Then run the import.
mysql dbname < /root/dump.sql
Configure Nginx to look at the new files
Finally, modify your NginX config to point to the new files.
vi /etc/nginx/sites-available/yourdomain.conf
(or whatever it’s called)
change the folder in your config file to point to the new folder that’s present after rsync is complete.
Note: You may have different nginx users for source and destination web servers – to alter the owner of the web files, you can use something like this:
chown wordpress:wordpress /var/www/yourfolder/ -R
Changing Domain Names on huge sites
If you’re also changing domain names, e.g. if you’re creating a staging or dev site, or maybe temporarily moving your site to different hosting to check performance then you can’t use WordPress search & replace plugins and even the interconnectit web-based script will break on huge sites.
So, use the command line version of interconnectit. Download using the following:
cd /root/
git clone https://github.com/interconnectit/Search-Replace-DB.git
cd Search-Replace-DB/
Note: If you are using PHP 7, you’ll need to grab the latest version from here and upload it to your server:
https://interconnectit.com/products/search-and-replace-for-wordpress-databases/
Now you can run search and replace in your database – change the text in CAPS below with your own specific details:
php srdb.cli.php -h localhost -n DBNAME -u DBUSER -p 'PASSWORD' -s 'ORIGINALDOMAIN' -r 'NEWDOMAIN'
Note: The above command includes placing the database password in the command line. That means there is the danger of it ending up in the history and you don’t want this. To avoid the command going in the history list, ensure you put a single space before the command – i.e. a space before the letters php. This signals to linux to not log this command.
Migrating SSL certificates
You can either copy them across manually, if you’re keeping the same domain name, or create new ones using Letsencrypt.
git clone https://github.com/letsencrypt/letsencrypt /opt/letsencrypt
/opt/letsencrypt/letsencrypt-auto certonly -a webroot --webroot-path=/var/www/acme/ -d peepgo.com -d www.peepgo.com --register-unsafely-without
email --agree-tos
The new SSL key files will be in /etc/letsencrypt/live/yourdomain/fullchain.pem and /etc/letsencrypt/live/yourdomain/privkey.pem.
To add them, modify your /etc/nginx/sites-available/yourdomain.conf file (or varnish.yourdomain… file) and find the current two lines which specify the keys for the old domain/server:
 ssl_certificate /etc/letsencrypt/live/yourdomain/fullchain.pem;
 ssl_certificate_key /etc/letsencrypt/live/yourdomain/privkey.pem;
Modify the paths for those 2 lines in the nginx sites-available file to match the location of your newly generated letsencrypt SSL keys. Restart nginx to get it to pick up the new key files.
service nginx restart
Additional SSL migration steps when migrating from proxy-SSL
If you are migrating from WP-Engine, or maybe you’re using Cloudflare, your site may actually be HTTP instead of HTTPS with the SSL only existing between your customers and the proxy.
If that is the case, you can end up with redirect errors. To avoid this, you can do the following:
- Install the Really Simple SSL plugin on your new server and activate it
- Test by altering your own hosts file to point the domain at the new server
- You will need to re-activate the plugin after you have re-copied the DB, e.g. if you’re allowing a couple of minutes downtime between SQL backup and restore
- Once the migration is complete and you have switched domains, you can permanently fix the SSL issues by running the following command:
php srdb.cli.php -h localhost -n DBNAME -u DBUSER -p 'PASSWORD' -s 'http://originaldomain' -r 'https://newdomain'
You will need to run the above command from the folder you downloaded this program to earlier – probably in /root/Search-Replace-DB/
Once the search/replace is complete, you can deactivate the Really Simple SSL plugin and delete it.
Fixing WordPress file and folder permissions
Some problems can occur. e.g. if the originating host messed around with wp-config.php then they might have altered ABS definitions. Or, permissions might have been set badly on the originating host.
Useful commands below to fix WordPress folder permissions:
chown wordpress:wordpress /var/www/domain/ -R

find /var/www/domain/ -type d -exec chmod 755 {} ;

find . -type f -exec chmod 644 {} ;
Debugging & Troubleshooting any issues
If you are having issues, there are a number of log files you can examine:
tail /var/log/nginx/varnish.yourdomain.conf.error.conf
tail /var/log/nginx/yourdomain.conf.error.conf
tail /var/log/nginx/error.conf
tail /var/log/php7.0-fpm.log
Also, you can edit wp-config.php and add these lines:
define('WP_DEBUG', true);
define('WP_DEBUG_LOG', true);
define('WP_DEBUG_DISPLAY', false);
Then try and load your broken home page. Once it has failed, you can look in the new wp-content/debug.log file:
tail /var/www/yourdomain.com/wp-content/debug.log
Summary
The above shows the guaranteed method to migrate WordPress sites of any size. If you have any questions, or think I’ve missed anything, let me know below.


Excellent instructions. Thanks for writing them.
If you just want to create a clone of your website you could try out the WP STAGING plugin. I tested it with websites with 20GB of data without any timeouts: https://wordpress.org/plugins/wp-staging/
Disclaimer: I am the author of the plugin
Hi – thanks for letting us know. It looks like it creates a backup of the site on the server before copying across. If that includes the uploads folder, that’s not really a possibility for the larger sites because they just don’t have enough disk space – hence why rsync above is used.
But thanks – there’s also Navicat which is a desktop application that will download and reupload your site to somewhere else and WP DB Migrate Pro.
Hi Dave,
thanks very much for this advanced tutorial.
I recently have exactly the mentioned timeout problem. The site I have developed is still a prototype prior to launch as the life site, but the database already has a size of 1.6 GB and so I wanted to test if backup restoring is working. I use a managed backup solution from WPMU Dev which offers direct restoring or download backup file. As automated restoring always dropped after some minutes with an error message I downloaded the backup file and tried restoring manually via the given .php installer file. Writing WP files worked well, but when it came to writing the DB tables it always ended in timeout, even with no timeout limits set on my server.
That is why I have a special question. I am using AWS’ external database service named Aurora, which is 100% MySQL compatible, and the database is configured in wp-config.php with this line of code:
define(‘DB_HOST’, ‘111.22.33.444:3306’);
Now I am not sure if I could use the given mysql commands just like that because it would probably configure the localhost mysql default engine holding a Plesk installation. As far as I understand I might have to use the AWS CLI to send mysql commands. But I have no experience yet with this.
I really want to dive deeper into SSL based restoring because I know that the DB will grow tremendously as soon as the multisite environment will show up with subdomain based subscriptions and the store will contain a couple of 100K products (right now it contains only 16K products).
Any thoughts are welcome.
Thanks again and best regards.
Rod
No you definitely don’t need to use the AWS CLI to send the MySQL commands. One issue you might run into (hopefully would run into) is a firewall issue – this would mean you couldn’t connect to your 111.22.33.444:3306 MySQL instance from just anywhere. So – first thing to do is to SSH to your web server (which we know is accepted by the remote db otherwise wordpress wouldn’t be working). You just need to add a parameter to the mysql and mysqldump commands. Note, in my examples, I’m using unix sockets to connect to MySQL hence why I don’t need the -u (username) or -p (password parameters) – it trusts me because I’m root basically. Since your MySQL is on a different server, you’ll need the username, password and host parameters. e.g.
So -u username is obvious. -p says Ask me for a password. This avoids passwords being registered in your server’s history (you shouldn’t put passwords in the command line). -P (capital p) lets you choose the port. And then you might need to use the dbname at the end too.
If you run the above from your server, you should get a password prompt, enter that and you should be logged in to mysql on your remote host where you can run mysql commands (e.g. to create database, create users, grant privileges etc).
Note: To enter MySQL passwords with SSH is easy, but confusing at first if you’re not familiar. Copy the password from your wp-config.php file, so it’s in your clipboard, now when the password prompt appears in SSH just right click on the screen. It won’t look like anything happened – because linux doesn’t use the *** approach of other operating systems – but right click is your PASTE command in a shell window.
For mysqldump, it’s very similar:
So to restore, you’d use this command – Note: the dbname parameter has moved to the -D parameter here (this also means you don’t need to sed the file to add USE DB at the top, although I prefer that):
Remember to use screen so you can happily disconnect and reconnect at will.
Hi Dave,
thanks a lot for the detailed information. Really excellent instructions. So it’s a complete tutorial now that puts me on the safe side. It’s good to know. Now I just need to test everything.
Thanks again.
Rod