One of our most popular articles is our guide to building your own WordPress cluster. If you haven’t seen it yet, you can build your own WordPress cluster. Our cluster guide involves setting up multiple nodes using Unison for file replication, PerconaDB Xtra-DB for database replication and an nginx load balancer to balance the traffic across the nodes.
This guide covers most maintenance and management items you will need to know to keep your cluster healthy and running.
Quick recover of PerconaDB cluster failure
If all of your DB servers crashed simultaneously, you need to find out which node has the latest data. It may be more than 1 node, in which case you can pick either as the one to bootstrap from.
mysqld_safe –wsrep-recover
Look for the ‘Recovered position’ line in the output, and note the number at the end for each node. Whichever node has the highest number, that one will be your bootstrap node.
pgrep mysql
If the above returns any process IDs, run the following to kill them:
kill -9 1234567
(replace 1234567 with the IDs listed by pgrep)
vi /var/lib/mysql/grastate.dat
Edit the 0 next to safe_to_bootstrap to 1.
/etc/init.d/mysql bootstrap-pxc
Now on the other nodes, run this:
service mysql start
Your cluster will be back up and running.
Table of Contents
Identifying issues
Your load balancer is an important tool to help you identify problems with individual nodes in your cluster. If you are seeing intermittent errors, probably there is an issue with one of your nodes. Here are some useful commands:
View Recent MySQL Log
There are 2 main places to view your MySQL log. One of them refers to errors with queries, which is not really relevant here. The other lets you see errors with the MySQL daemon. That’s the one you want to view to check for any issues with starting up your cluster, or any nodes in the cluster.
tail /var/log/mysqld.log -n 500
View Replication Status
The Galera cluster, which PerconaDB XtraDB Cluster is based on, stores info about replication inside MySQL. So, log into MySQL and run the following:
show status like 'wsrep%';
You can also see some information in the system files. Have a look in these files to see some extra info:
/var/lib/mysql/grastate.dat
/var/lib/mysql/gvwstate.dat
In addition, just the fact that some of these files exist provide info.
View Unison Status
If you have reason to believe that files are not transferring to each of your nodes, you can check file replication. The most obvious way to test this is to modify or create a file inside your replicated WordPress folder and see if it instantly appears on the other nodes.
You can run Unison manually on node 1 to see any error messages it might be spitting out:
unison /var/www ssh://10.130.47.4//var/www -owner -group
Change the IP address above to node 2 or node 3 to identify error messages.
Restoring a database
In a cluster, there are some limits on commands that can be run – primarily, lock tables and ALTER tables. Because of this, the standard mysql.sql dump file will probably fail when you use it to create your database. You can avoid this by eliminating the lock commands. Presuming your file is called /root/mysql.sql then use this:
sed -i '/^LOCK TABLES/-- LOCK TABLES/' /root/mysql.sql
sed -i 's/^UNLOCK TABLES/-- UNLOCK TABLES/g' /root/mysql.sql
Alternatively, you can detach the cluster by removing IP addresses from the gcomm line in wsrep.cnf then restarting MySQL on that node (typically your ‘master’). Then you can restore databases and keep the LOCK and UNLOCK commands in there. While you’re doing this, the other nodes will continue running. That means, you can take 1 node out, run a restore, then run a bootstrap. Once the bootstrap is complete, you can add this master node into the cluster and remove node 2 then restart mysql and it will rejoin the new cluster and take the bootstrap snapshot. In this way, you can run a complete restore and bootstrap to get all nodes refreshed with a new database with zero downtime.
Rebuilding your cluster
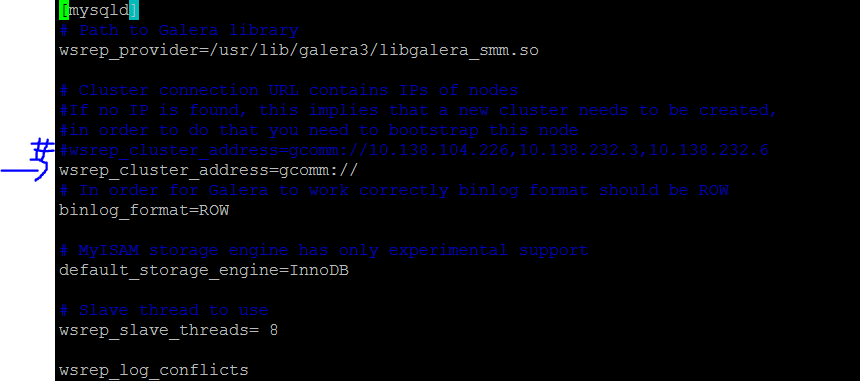
You may need to rebuild your cluster sometimes. The easiest way to do so is to edit the wsrep.cnf file, remove the IP addresses from the gcomm line, stop MySQL service then start the bootstrap again. Once it has bootstrapped, you can start mysql on the other nodes again, one at a time.
vi /etc/mysql/percona-xtradb-cluster.conf.d/wsrep.cnf
Removing nodes from your cluster
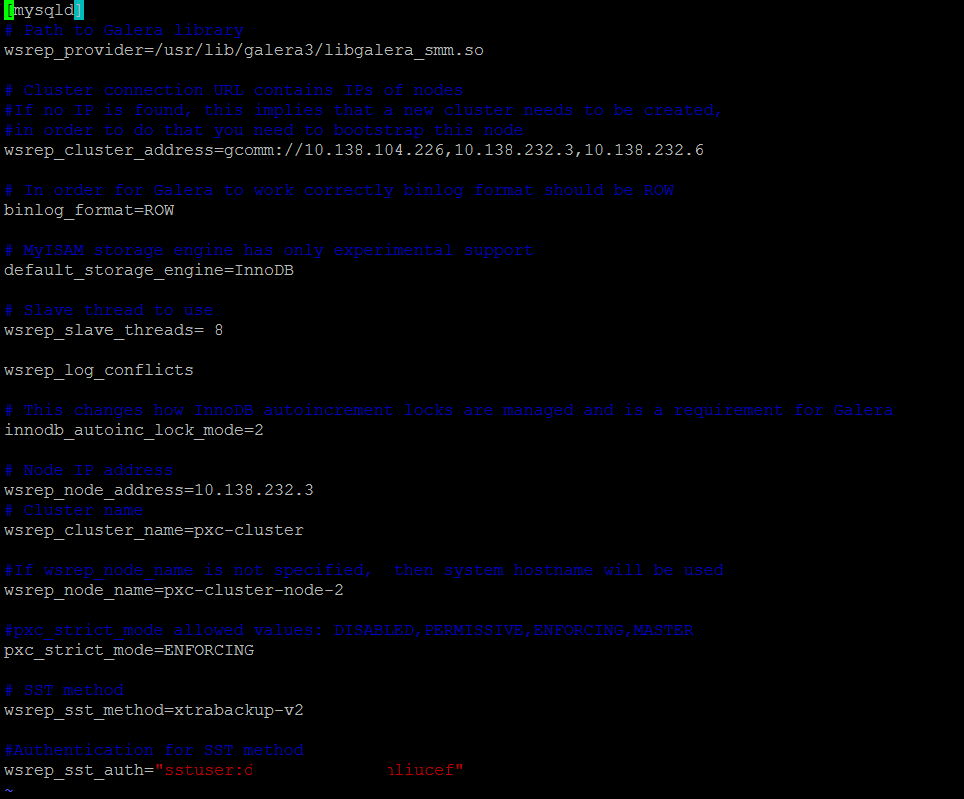
You can just switch off MySQL to remove the database node, or power-down the node.
If you need to remove a node permanently, the file to edit is:
vi /etc/mysql/percona-xtradb-cluster.conf.d/wsrep.cnf
If you remove the IP addresses of the 2nd and 3rd nodes from the file for node 1, then you will be able to restart mysql and be back at a single node.
Removing and adding nodes to your cluster
Sometimes you need to remove a node from the cluster in order to upgrade it. The easiest way is to simply remove the node from the loadbalancer. One way to do that is to alter the nginx config files on your loadbalancer to remove the IP address of the node in question, then restart Nginx.
The quickest way is to comment out the node that you want to remove then run:
service nginx reload
Set up automatic node removal
If you make your loadbalancer config file look like the following, it becomes possible for nodes to be automatically removed when either nginx, or mysql or anything else fails on the node in question.
upstream backend {
 server backend1.example.com slow_start=30s max_fails=3 fail_timout=30s;
 server backend2.example.com slow_start=30s max_fails=3 fail_timout=30s;
}
Now – if you want to remove a node from the load balancer, you can just switch it off or stop nginx and it will be removed after 30s. (note: traffic has to hit 3 times before it gets removed, and these 3 hits will see errors)
You can reduce or increase the max_fails or fail_timeout values to your liking. If you want active node failover, it’s easily possible with Nginx Plus where you can set up HTTP Health Checks.
With regular Nginx, it’s a little more complicated, but not impossible. Essentially, you can run a script on your load balancer which does a wget of a particular page on each node every few seconds. Ideally, this page should be a PHP script which connects to your database and checks a value in the database. That way, you know that Nginx, PHP and MySQL are all working on that node. You then have the script check for a specific value in the page it fetches, and if it’s not there, have the script search replace your loadbalancer.conf file and comment out the node that has failed. Then get the script to run service nginx reload to reconfigure the loadbalancer with zero downtime.
Force a PerconaDB Galera Cluster rebuild
Sometimes, your nodes might refuse to rejoin the cluster. You’re best figuring out why this is, but if you don’t care, and you know you have 1 good node to build from then you can do the following:
Firstly, remove node 2 and 3 from the load balancer. I’m presuming node 1 is your healthy node in this case.
Then on node 2 and 3, stop MySQL then delete the cluster cache:
service mysql stop
rm /var/lib/mysql/grastat.dat
rm /var/lib/mysql/sst_in_progress
rm /var/lib/mysql/galera.cache
Next, edit the replication file.
vi /etc/mysql/percona-xtradb-cluster.conf.d/wsrep.cnf
Remove the IP addresses from the gcomm:// line.
Stop MySQL then start it again. Now it will be in single-node mode where you can run more commands (like ALTER TABLE etc).
Bootstrapping PerconaDB Cluster
PerconaDB clusters come with auto-recovery, but sometimes you may need to restart your cluster from scratch. This involves choosing 1 of your nodes to be the new ‘start point’ or ‘master’, then bootstrapping from it then having your other nodes join this new cluster.
To bootstrap, follow the guide in my original cluster article, or follow the guide above to force a cluster rebuild. They’re basically the same thing. You need to have your wsrep.cnf file configured, with no IP addresses in the gcomm line on the new master. I’ve outlined how to do that above, and there’s more info in these two links:
- https://www.percona.com/doc/percona-xtradb-cluster/5.5/manual/bootstrap.html
- https://www.percona.com/blog/2014/12/03/auto-bootstrapping-an-all-down-cluster-with-percona-xtradb-cluster/
Troubleshooting
PerconaDB fails to start on a particular node
Firstly, check the mysqld.log file as this is where the MySQL daemon errors can be found:
tail /var/log/mysqld.log -n 500
A node might fail because the timeout limit is being reached for ‘service startup’. You can increase this which will allow for all the data to be copied across from node 1.
sudo MYSQLD_STARTUP_TIMEOUT=900 service mysql start
It could also fail to start because of a previously failed node-copy. In that case, you can rebuild your cluster easily enough using the guide above.
Restarting a cluster when all nodes were down
It’s a little annoying, but if ALL your nodes went down then you have to make a manual modification to one of the files on one of the nodes to bring the cluster back up.
Firstly, view the grastate.dat file on each node.
cat /var/lib/mysql/grastate.dat
One of them will have been the last node to be removed, and this one will have the value of:
safe_to_bootstrap: 1
On that node, edit the following file:
vi /etc/mysql/percona-xtradb-cluster.conf.d/wsrep.cnf
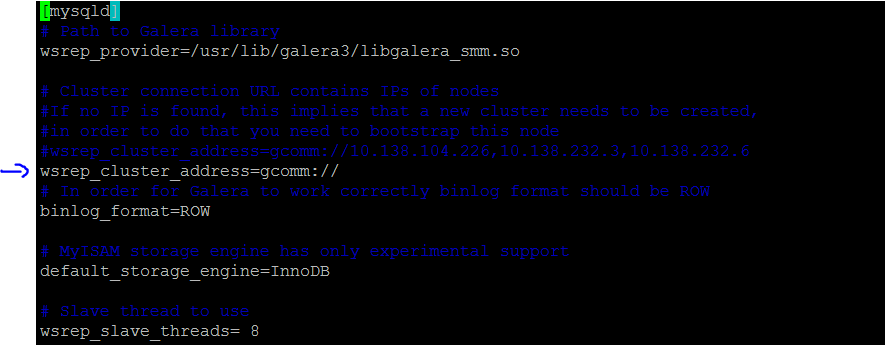
Comment out the wsrep_cluster_address=gcomm://ip1, ip2, ip3 line and insert a new line below it without any ip addresses, i.e:
wsrep_cluster_address=gcomm://
Now, you can start this node safely.
/etc/init.d/mysql start
(or service mysql start)
Once it has started, you can safely start the other nodes in your cluster.





would you comment how you would deal with database tables without primary keys? there seems to be a lot of such tables in wordpress.
this seems to be a design defect of wordpress – since all databases should have a primary key for performance and identification purpose
https://www.percona.com/doc/percona-xtradb-cluster/LATEST/features/pxc-strict-mode.html
https://stackoverflow.com/questions/2515596/can-a-database-table-be-without-a-primary-key
Either add a primary key to tables where a PK doesn’t exist or don’t use strict mode. It’s extra tables created by plugins that are the culprit here, and almost always there’s an obvious primary key that can be added and if not then a composite primary key can be created which guarantees uniqueness.